The first time I made this focaccia, I got a bit cocky. I thought, “It’s just bread with toppings, how hard can it be?” Well, the dough stuck to everything, the olives sank like stones, and I burned the bottom so badly it fused to the tin like an archaeological find.
But oh, when you do get it right—it’s the kind of bake that makes you tear off a piece while it’s still too hot, blow on your fingers, and go back for more before it’s even on the table.
The egg wash was a curveball—I nearly skipped it. But it turned out to be the secret to that glossy, bronzed top. So let me show you how I finally cracked it (and why I now make this almost every Sunday).
What Makes This Recipe Special
I’ve tried a dozen focaccia recipes, and most miss one of two things: proper hydration or bold flavour. This one nails both. Here’s why it works so well:
- The dough is enriched with an egg, which isn’t typical—but gives it a richer crumb and a softer interior.
- The ratio of olive oil to flour gives a tender, pillowy base without being greasy (I once overdid the oil—it basically fried in the tin).
- Mary’s mix of Parmesan, garlic, olives, and tomatoes bakes straight into the dough, not just on top. Every bite’s got flavour—not just the edges.
INGREDIENTS + WHY THEY MATTER
- Strong White Bread Flour – High protein for proper gluten development and that chewy, structured crumb. I tried plain flour once—big mistake. Too cakey.
- Fast-Action Yeast – Speeds things up without compromising rise. I once used old yeast… and got focaccia that doubled as a doorstop.
- Egg – Adds richness and moisture. Totally unexpected in a focaccia, but I love the texture it gives.
- Sun-Dried Tomatoes – Intense flavour. Just don’t skip chopping them—they get leathery if left too big.
- Parmesan – Adds a salty umami kick. I’ve tried Cheddar in a pinch, and it worked—but lacked that sharpness.
- Olives – Salty contrast. I like using a mix of green and black for depth. Avoid pre-sliced ones—they’re too wet.
- Fresh Rosemary – Classic, but powerful. Go light, or it’ll overpower everything.
Making It Yours (Without Ruining It)
Want to play around? These swaps do hold up:
- Dairy-Free? Skip the Parmesan and brush with olive oil instead of egg. Still tasty, just less glossy.
- Egg-Free? Brushed with olive oil plus a splash of soy milk instead. Softer crust, but golden enough.
- Gluten-Free? Honestly… I’ve yet to make one that wasn’t either too dense or weirdly sticky. Would love to hear if someone cracks it.
- Add-Ins That Work: Caramelised onions (let them cool first), roasted red peppers (well-drained), or chopped artichokes.
Mistakes I’ve Made (and How to Avoid Them)
| What Went Wrong | Why It Happens | How to Fix It |
|---|---|---|
| Dough stuck to the tin | Not enough oil on the base | Be generous—like, actually puddle it in |
| Dense texture | Under-kneaded or water too hot | Mix until elastic; check water temp |
| Toppings burnt | Added too early, especially garlic | Fold into the dough, not on top |
| Olives/tomatoes bunched up | Didn’t knead them in evenly | Press into dough gently after folding in |
How To Make Mary Berry’s Focaccia
- Prep the tin
Grease a Swiss roll tin with a good glug of olive oil. Mine’s old and slightly warped—it still works fine. - Make the dough
In a stand mixer with a dough hook, combine flour, yeast, salt, sugar, oil, and warm water. Mix on medium for 5 minutes until smooth and stretchy. (By hand? Knead for at least 10 minutes until elastic—not sticky like glue.) - First rise
Tip into an oiled bowl, cover with cling film, and leave in a warm spot for 1 to 1½ hours. It should at least double in size—give it time. - Add the flavourings
Turn the dough onto a floured surface and knead in olives, sun-dried tomatoes, Parmesan, and garlic. Don’t rush this—get them evenly in, not clumped. - Shape and prove
Press into your tin—don’t stretch, just gently pat it into place. Dot the rosemary sprigs over the top. Cover loosely (I use a plastic bag like Mary suggests) and let it prove for 30 minutes, until puffy. - Egg wash + salt
Brush gently with beaten egg, sprinkle with sea salt. - Bake
Into a hot oven—220°C (200°C fan) for 25–30 minutes. It should be deep golden, with a firm base. (If unsure, lift a corner—it should sound hollow when tapped.) - Cool slightly, then slice
Best warm, but it holds up well at room temp too.

Tips From My Kitchen
- I use a cheap plastic shower cap to cover the bowl for rising—it’s reusable and keeps things snug.
- If your dough feels tight after shaping, let it rest 10 minutes before proving—prevents tearing.
- I bake mine on the lower oven shelf so the base crisps nicely.
- Brush with extra olive oil after baking if you skip the egg—adds gloss and flavour.
Storage + Serving
- Fresh is best – Eat warm if you can.
- Fridge – Keeps for 3 days in a sealed container. I reheat slices in the air fryer for a crispy edge.
- Freeze – Wrap tightly in foil plus bag. Freeze up to 2 months.
- Reheat – Oven (180°C, covered in foil) is best. Microwave works but softens the crust.
FAQs – Real Questions, Real Answers
Q: Can I make this without a stand mixer?
A: Yes! I’ve done it by hand plenty of times. Just be ready for a proper knead—10 to 12 minutes minimum.
Q: Why does mine come out dense?
A: Most likely the dough didn’t rise enough or you used water that was too hot. Yeast is picky.
Q: Can I make it ahead?
A: You can do the first rise overnight in the fridge. Bring it back to room temp before adding toppings and baking.
Q: Is it supposed to be crusty or soft?
A: Somewhere in between. The crust should be golden and lightly crisp, but the inside soft and chewy.
Q: Can I use wholemeal flour?
A: I tested 50/50 wholemeal to white and it worked—but it’s heavier. You’ll need a longer rise.
Try More Recipe:
- Mary Berry Leek and Bacon Quiche
- Mary Berry Vegetable Kebabs
- Mary Berry Pan Fried Falafel
- Mary Berry Mushroom And Asparagus Risotto
Mary Berry Focaccia
Course: DinnerCuisine: ItalianDifficulty: Easy10
servings2
hours25
minutes30
minutes142
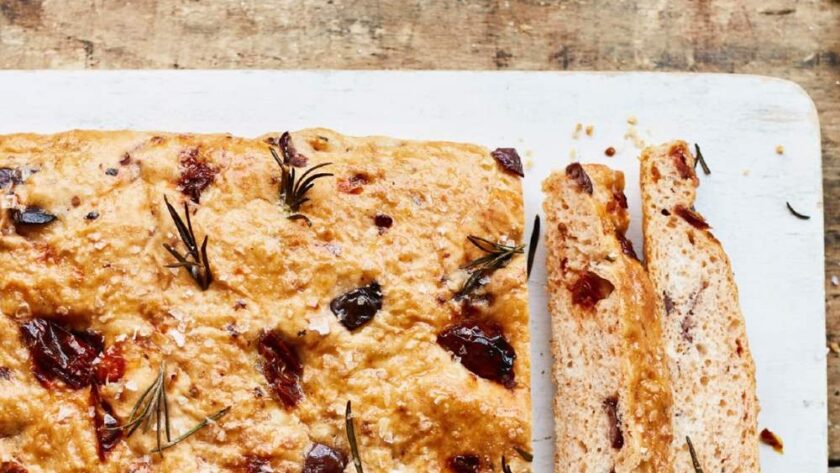
kcalSoft, golden focaccia packed with olives, sun-dried tomatoes, and Parmesan—perfect for sharing or stealing a warm corner slice.
Ingredients
- For the Dough:
1lb (450g) strong white bread flour, plus extra for dusting
¼oz (7g) fast-action dried yeast
1 tbsp olive oil, plus extra for greasing
½ tsp salt
1 tsp caster sugar
10 fl oz (300ml) warm water
1 beaten egg
Sea salt, for sprinkling
- For The Flavourings
5oz (150g) olives, roughly chopped
4oz (100g) sun-dried tomatoes, roughly chopped
4oz (100g) Parmesan cheese, finely grated
2 garlic cloves, crushed
1 sprig of rosemary, snipped into small sprigs
Directions
- Preheat oven to 220°C (200°C fan). Grease a 23x33cm tin with olive oil.
- In a stand mixer (or bowl), mix flour, yeast, salt, sugar, oil, and warm water. Knead 5–10 minutes until smooth.
- Transfer to oiled bowl, cover, rise in warm place 1–1½ hours until doubled.
- Turn onto floured surface, knead in olives, tomatoes, Parmesan, and garlic.
- Press into tin. Dot rosemary on top. Cover and let rise 30 minutes.
- Brush with egg, sprinkle sea salt.
- Bake 25–30 minutes until golden and risen.
- Cool slightly, slice, and serve with olive oil and balsamic.
Notes
- I use a cheap plastic shower cap to cover the bowl for rising—it’s reusable and keeps things snug.
- If your dough feels tight after shaping, let it rest 10 minutes before proving—prevents tearing.
- I bake mine on the lower oven shelf so the base crisps nicely.
- Brush with extra olive oil after baking if you skip the egg—adds gloss and flavour.