I first tried Florentines at a café in Bath on a rainy afternoon—they looked elegant, lacy, and frankly a bit intimidating. So naturally, I thought, “I’ll bake those at home!” (Spoiler: I did, and the first batch was a proper mess.)
My mistake? I spooned them too close together, and they baked into one glorious, caramelised sheet. Delicious, but not quite what Mary had in mind. And don’t get me started on the chocolate base—turns out, slathering it on too soon makes everything slide off.
But after a few tweaks (and one burnt tray), I got them crisp around the edges, chewy in the middle, and coated with that just-right zigzag of chocolate. Let me show you how I fixed it.
Why This One Works So Well
Most Florentine recipes either spread too far or end up stodgy. Mary’s version keeps things light with just enough flour to hold it together, without turning them cakey.
The real magic? It’s in the balance of sticky golden syrup and crunchy chopped nuts. I didn’t think 4 glacé cherries would do anything—but they really do. They pop with sweetness and keep the whole thing from feeling too rich.
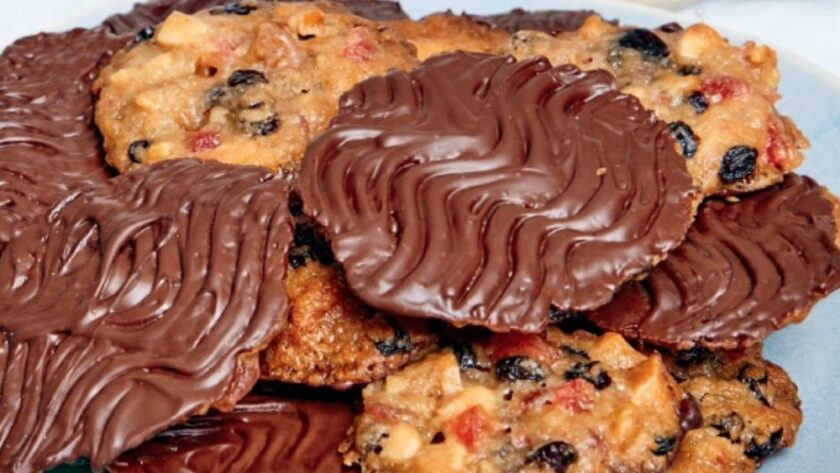
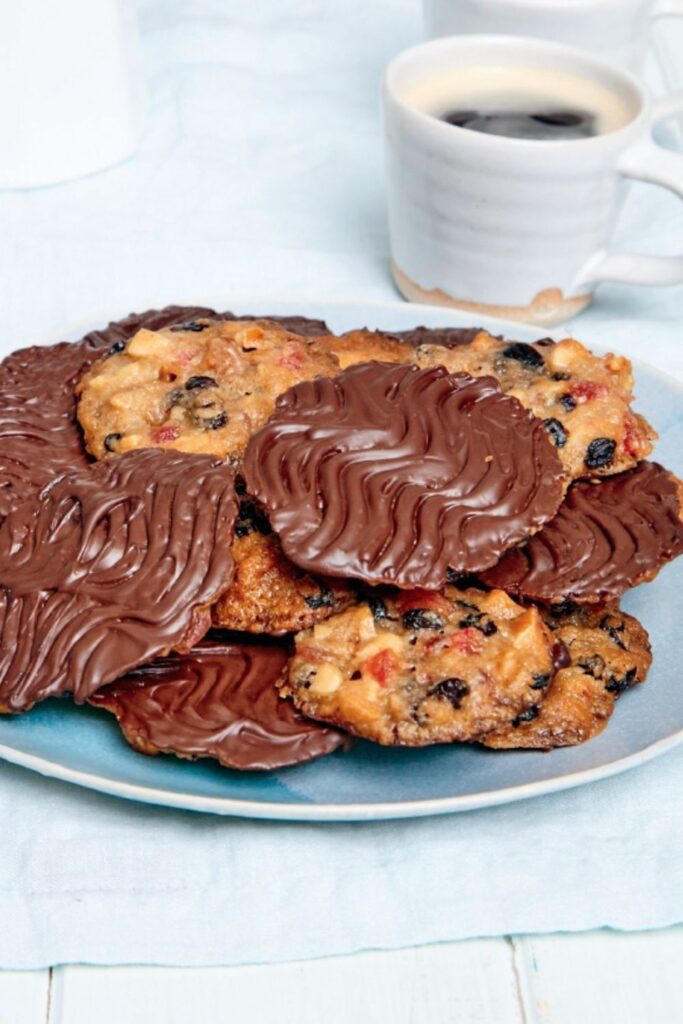
And if you’ve ever been tempted to skip the zigzag chocolate? Don’t. It’s not just pretty—it locks in the chew.
INGREDIENTS + WHY THEY MATTER
- Butter – Adds richness and helps the mixture spread. Unsalted is best so you can control the flavour.
- Demerara Sugar – Gives that signature toffee crunch. I once tried soft brown sugar—too wet, didn’t hold shape.
- Golden Syrup – The glue! Holds everything together and adds that lovely caramel note. Don’t sub with honey—it bakes differently.
- All-Purpose Flour – Just a touch, to bind. Too much and they go cakey.
- Glacé Cherries – Sweet bursts in each bite. Chop them tiny or they’ll clump.
- Currants – Add chew. I tried raisins—they were too big and dominated the mix.
- Chopped Nuts – Almonds work best, but walnuts bring a nice bitterness. Toasted? Even better.
- Bittersweet Chocolate – Don’t go too dark. I used 70% once and it overwhelmed the rest.
Ingredient Swaps That Hold Up
- Nut-Free? Try toasted pumpkin seeds or sunflower seeds for crunch.
- No currants? Dried cranberries (chopped) work well—but reduce slightly, or it gets too sticky.
- Gluten-free? I tested with a 1:1 GF flour blend—it worked. Just spread slightly more.
- Vegan version? I used vegan butter and maple syrup instead of golden syrup. Still crisp, still chewy—though a touch less shiny.
Mistakes I’ve Made (And How to Avoid Them)
| What Went Wrong | Why It Happens | How to Fix It |
|---|---|---|
| All merged together | Spooned too close on tray | Space them well—they spread like mad |
| Chocolate slid off | Florentines still warm | Cool fully before adding chocolate |
| Broke when lifting | Left to cool too long on tray | Warm them briefly in oven if stuck |
| Bitter flavour | Burnt the edges | Check at 8 mins—mine browned fast |
How to Make Mary Berry’s Florentines
- Preheat your oven to 350°F (or 320°F fan). Line 2–3 trays with silicone sheets or baking paper.
- Melt the butter, sugar, and golden syrup gently in a small pan. Don’t let it boil—just melt until smooth.
- Mix flour, chopped cherries, currants, and nuts in a bowl. Pour in the warm syrup mixture and stir thoroughly.
- Spoon teaspoon-sized blobs onto the trays—leave loads of space (they flatten and spread wide).
- Bake for 8–10 minutes until golden brown. Mine looked pale at 8 minutes but darkened fast—don’t wander off.
- Cool on tray for 2 minutes, then gently lift with an offset spatula onto a wire rack. If they harden too much, pop them back in the warm oven for 30 seconds.
- Once fully cool, coat the flat base with melted chocolate. Drag a fork through the chocolate to make that classic zigzag. Let them set upside down on the rack.

Tips From My Kitchen
- I toast the nuts lightly before adding—makes the flavour pop.
- I use a silicone mat—parchment works, but silicone peels off cleaner.
- I let the chocolate cool slightly before spreading—stays put better.
- One tray at a time is safer. My oven’s hot spots messed up a whole batch once.
Storage + Serving
- Store in an airtight tin at room temp for up to 1 week.
- Freeze: Yes. Layer with parchment in a container. Defrost at room temp.
- Serve with strong tea, espresso, or alongside vanilla ice cream (posh dessert in seconds).
- Don’t refrigerate—they’ll go soft and lose their snap.
FAQs – Real Query Answers
Q: Can I skip the chocolate?
A: Technically, yes—but they won’t feel like proper Florentines. The chocolate base gives them structure (and drama).
Q: Why are my Florentines greasy?
A: Butter overheated or too much syrup. Next time, melt gently and stick to the recipe’s quantities.
Q: Can I make these nut-free?
A: Yes—I’ve swapped chopped nuts for toasted seeds. Still crisp, but slightly less rich.
Q: Can I make mini ones?
A: Absolutely—just use half teaspoons and shave a minute or two off the bake time.
Q: My Florentines stuck! Help!
A: Use a silicone sheet, and don’t wait too long to lift. Warm oven trick saves the day.
Try More Mary Berry Recipes:
- Mary Berry Christmas Apricot Trifle
- Mary Berry Salted Caramel Brownies
- Mary Berry Lemon Mousse
- Mary Berry Strawberry Pavlova
- Mary Berry Apple Crumble
Mary Berry Florentines
Course: DessertsCuisine: BritishDifficulty: Easy24
servings15
minutes10
minutes115
kcalCrisp, chewy, and dipped in chocolate—these classic Mary Berry Florentines are easier than they look and truly irresistible.
Ingredients
4 tbsp (2 oz/55g) butter
¼ cup (2 oz/50g) demerara sugar
2¾ tbsp (2 oz/55g) golden syrup (available online)
½ cup (2 oz/50g) all-purpose flour
4 glacé cherries, finely chopped
⅓ cup (1.8 oz/50g) currants
⅔ cup (2 oz/55g) chopped nuts (e.g., almonds, walnuts)
- For the Topping:
6 oz (175g) bittersweet or semisweet chocolate, melted
Directions
- Preheat your oven to 350°F (or 320°F fan). Line 2–3 trays with silicone sheets or baking paper.
- Melt the butter, sugar, and golden syrup gently in a small pan. Don’t let it boil—just melt until smooth.
- Mix flour, chopped cherries, currants, and nuts in a bowl. Pour in the warm syrup mixture and stir thoroughly.
- Spoon teaspoon-sized blobs onto the trays—leave loads of space (they flatten and spread wide).
- Bake for 8–10 minutes until golden brown. Mine looked pale at 8 minutes but darkened fast—don’t wander off.
- Cool on tray for 2 minutes, then gently lift with an offset spatula onto a wire rack. If they harden too much, pop them back in the warm oven for 30 seconds.
- Once fully cool, coat the flat base with melted chocolate. Drag a fork through the chocolate to make that classic zigzag. Let them set upside down on the rack.
Notes
- I toast the nuts lightly before adding—makes the flavour pop.
- I use a silicone mat—parchment works, but silicone peels off cleaner.
- I let the chocolate cool slightly before spreading—stays put better.
- One tray at a time is safer. My oven’s hot spots messed up a whole batch once.