I’ll be honest—these were nearly a disaster the first time. I tried to rush the pastry. Big mistake. It shrank like mad in the oven and ended up more like biscuit cups than tartlet shells. But once I got the chilling right and stopped overworking the dough, they turned out spot-on: crisp, buttery pastry with just the right snap, a soft swirl of cream, and glossy fruit like little jewels on top.
What surprised me most? That tiny bit of glaze makes all the difference. It’s not just for shine—it pulls the whole tartlet together. Let me show you what I fixed, what I’d never skip again, and how to make these look as posh as they taste.
Why This One Works So Well
Most fruit tartlets either skimp on the pastry or overload the cream—but this one hits that sweet spot. The pâte sucrée is rich with yolk and just enough sugar, so it holds shape but melts in the mouth. And the glaze isn’t an afterthought—it’s what lifts the fruit from “just nice” to “you made these yourself?!”
Also: I tried using unsweetened whipped cream vs. lightly sweetened, and oddly, a plain cream gives the fruit way more room to sing.
INGREDIENTS + WHY THEY MATTER
- All-Purpose Flour – Just enough structure without being tough. I tested with cake flour—too soft, collapsed in the tin.
- Salted Butter – Adds depth. I once used unsalted and forgot to compensate; the pastry was flat-tasting.
- Sugar – For a gently sweet crust that balances the tart fruit.
- Egg Yolks – Richness and binding. I tried one whole egg once—nope. Too wet, too puffy.
- Heavy Cream – Whips up stable and silky. Lighter cream didn’t hold its shape.
- Fresh Fruit – Go for firm berries or sliced kiwi. Bananas looked sad by hour two.
- Red Currant Jelly / Apricot Jam – Gives that professional gloss. Don’t skip. Trust me.
MAKING IT YOURS (WITHOUT RUINING IT)
- Want it egg-free? I tested with a flax egg once—held together, but crumbly and not as crisp.
- Dairy-Free Cream – Coconut cream works if whipped cold. Slight coconut flavour, but nice with mango or pineapple.
- Fruit swaps – Strawberries, blackberries, kiwi, mango slices, even pomegranate seeds. Avoid watery fruit like melon.
- Glaze twist – You can steep a little vanilla or citrus zest into the glaze as it melts—adds a subtle lift.
MISTAKES I’VE MADE (AND HOW TO AVOID THEM)
| What Went Wrong | Why It Happens | How to Fix It |
|---|---|---|
| Pastry shrank in the oven | Didn’t chill it long enough | Chill at least 30 mins—cold dough = clean shape |
| Cream collapsed | Overwhipped or warm room temp | Whip to soft peaks and chill if room is warm |
| Glaze slid off the fruit | Fruit too wet or glaze too thick | Pat fruit dry, warm glaze until just pourable |
HOW TO MAKE MARY BERRY’S GLAZED FRUIT TARTLETS
- Make the Pastry: Rub butter into flour until it looks like coarse sand. Stir in sugar, then yolks. It should come together but not feel sticky. Wrap and chill 30 mins.
- Preheat Oven: 400°F (200°C)—hot enough for a crisp bake.
- Shape Tartlets: Roll dough on floured surface to ⅛-inch thick. Cut out 12 rounds with fluted cutter. Press gently into tartlet tins and prick with fork.
- Blind Bake: Line with parchment and add pie weights. Bake 15 mins until golden. Cool fully.
- Whip Cream: Beat until soft peaks form—not stiff. Spoon into cooled shells.
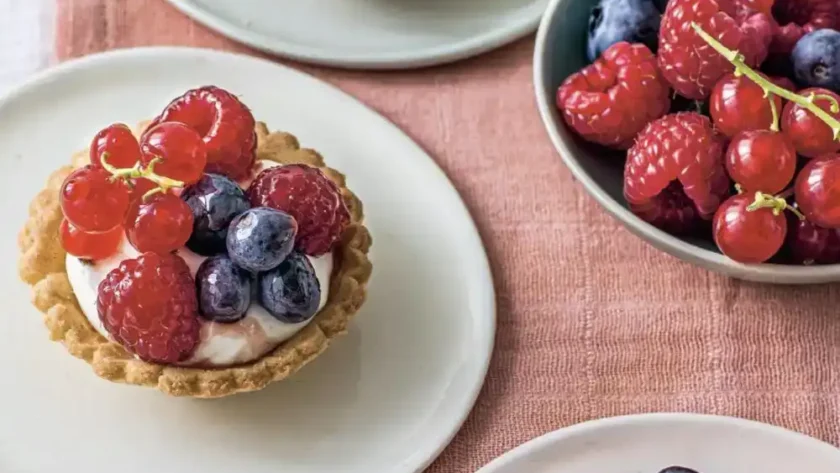
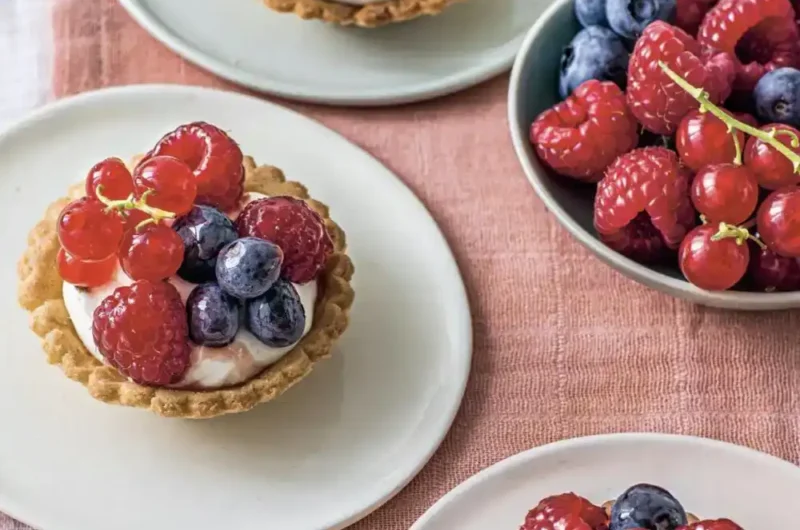
- Arrange Fruit: Get creative. I like a mix of red, blue, and green for contrast.
- Add Glaze: Warm glaze gently and brush over fruit. It should shine, not pool.

TIPS FROM MY KITCHEN
- I keep my rolling pin in the fridge—helps stop the pastry warming too fast.
- If the glaze sets too quickly, pop it back on low heat for 10 seconds.
- I never re-roll the scraps more than once—second roll is always tougher.
- Chill filled tartlets for 10 minutes before serving—they slice neater.
STORAGE + SERVING
- Fridge: Best eaten the same day. If you must store, keep in a lidded container up to 24 hours. Pastry softens, but still tasty.
- Freezing: Not worth it. Cream and fruit don’t thaw well.
- Serve with: A cup of strong tea, or for something cheekier, a glass of Prosecco.
FREQUENTLY ASKED QUESTIONS
Q: Can I make the pastry ahead?
A: Absolutely. It keeps 2 days in the fridge wrapped up. You can also freeze it—just defrost overnight in the fridge.
Q: What’s the best fruit combo?
A: My go-to: raspberries, blueberries, and sliced kiwi. Looks stunning, and flavours balance beautifully.
Q: Can I skip the glaze?
A: Technically yes—but they’ll look a bit sad and the fruit can dry out. Even a thin swipe of warm jam makes a big difference.
Q: My pastry is pale—what gives?
A: Could be underbaked or your oven’s cooler than it says. Try baking a few minutes longer, or use a metal tartlet tray—it conducts heat better.
Try More Recipes:
- Mary Berry Lemon Tart
- Mary Berry Strawberry Tarts
- Mary Berry Mini Bakewell Tarts
- Mary Berry Apple Tart
Mary Berry Glazed Fruit Tartlets
Course: DessertCuisine: UK12
servings30
minutes15
minutes180
kcalButtery tartlet shells filled with whipped cream, topped with fresh fruit, and finished with a glossy, fruity glaze.
Ingredients
- For the Pâté Sucrée (Sweet Pastry):
1 cup (115g) all-purpose flour, plus extra for dusting
¼ cup (55g) salted butter, softened
¼ cup (55g) sugar
2 extra-large egg yolks
- For the Filling & Glaze:
⅔ cup (150ml) heavy cream
1½–1¾ cups (225g) fresh fruits (such as raspberries and blueberries)
4 tablespoons red currant jelly (or apricot jam)
Directions
- Rub butter into flour until sandy. Stir in sugar. Add egg yolks and bring together to form dough. Chill 30 minutes.
- Preheat oven to 400°F (200°C).
- Roll dough, cut into rounds, and press into tartlet pans. Prick bases, line with parchment and weights.
- Bake 15 minutes until golden. Cool on a rack.
- Whip cream to soft peaks. Spoon into crusts.
- Top with fruit. Warm glaze and brush over generously.
Notes
- I keep my rolling pin in the fridge—helps stop the pastry warming too fast.
- If the glaze sets too quickly, pop it back on low heat for 10 seconds.
- I never re-roll the scraps more than once—second roll is always tougher.
- Chill filled tartlets for 10 minutes before serving—they slice neater.