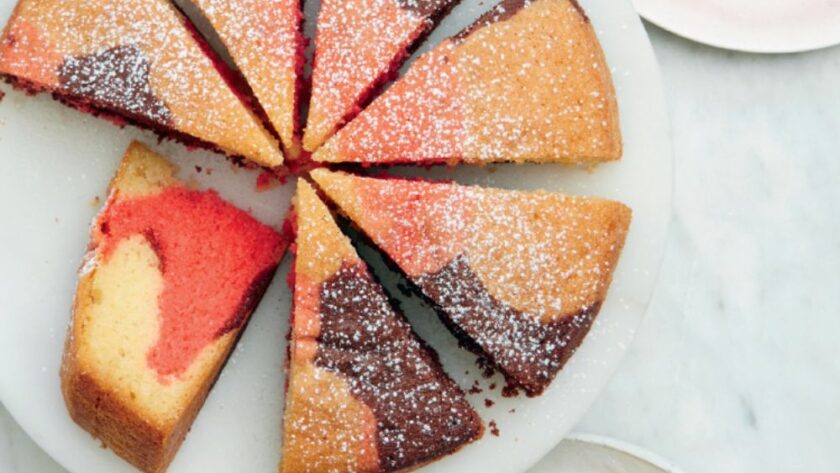
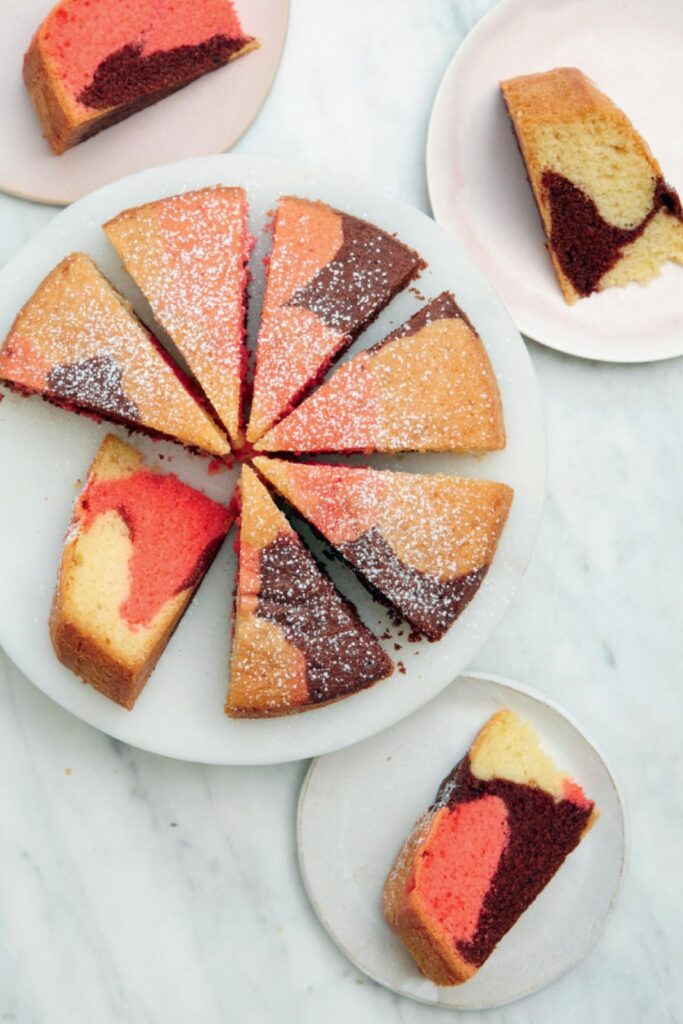
To be honest, the first time I made it, I completely botched the swirl. I got ambitious and tried dragging a knife through the batter like I’d seen on Bake Off… and ended up with one giant cocoa blob in the middle. Looked like a cow pat. Still tasty—but not the look I was going for.
Let me show you how I fixed that—and how to get those lovely pink, chocolate, and vanilla swirls just right.
Why This One Works So Well
This recipe’s magic is in its simplicity—but don’t let that fool you.
The sponge is based on the all-in-one method, so you chuck everything into the bowl and blitz it. But it’s the ratios that matter here. Equal weights of margarine, sugar, and flour mean you get a light, fluffy cake that still has enough structure to hold its marbled colours without bleeding together.
Most marble cakes rely just on cocoa and vanilla, but Mary cheekily adds a splash of red food colouring to create a third layer—pink. It sounds odd, but trust me: it looks brilliant once sliced. Like Neapolitan ice cream in sponge form.
INGREDIENTS + WHY THEY MATTER
- Margarine (170g) – I know, butter lovers will be skeptical. But margarine blends more easily straight from the fridge and gives a moist, soft crumb. I tried swapping in butter once—it worked, but the batter took longer to smooth out.
- Superfine (caster) sugar (175g) – Dissolves quickly, which helps keep the texture tender.
- Self-raising flour (175g) – The built-in raising agents give just enough lift. If you’re using plain flour, you’ll need to add 2 tsp baking powder instead.
- Baking powder (1 tsp) – Even with self-raising flour, this extra boost ensures a high, even rise.
- Eggs (3 large) – Room temp is key here. Cold eggs stiffen the margarine and mess with the mix.
- Cocoa powder (1 tbsp) + Hot water (1 tbsp) – Mixing with hot water helps bloom the cocoa, making it richer and smoother.
- Red food colouring – Just a few drops give that playful pink tone. I used gel colouring—it’s more vibrant and doesn’t water down the batter.
Making It Yours (Without Ruining It)
- No food colouring? Skip it and go classic with just chocolate and vanilla—still lovely.
- Egg-free version – I tested with 3 tbsp aquafaba per egg (so 9 tbsp total). It worked, but the sponge was slightly denser.
- Gluten-free? I had good results using a GF self-raising flour blend + ½ tsp xanthan gum. Not quite as light, but still very bakeable.
- Add-ins? I once folded in some chopped glacé cherries to the pink layer—tasted like a Battenberg had a fling with a brownie.
MISTAKES I’VE MADE (AND HOW TO AVOID THEM)
| What Went Wrong | Why It Happens | How to Fix It |
|---|---|---|
| Chocolate layer sank | Batter too runny after adding hot water | Let the cocoa mix cool slightly before combining |
| Swirls looked muddy | Overmixed when layering | Use spoonfuls, not swirls—just drop & go |
| Dry edges, soggy middle | Oven too hot or uneven tin | Use a deep tin and check temp with an oven thermometer |
HOW TO MAKE MARY BERRY’S MARBLE CAKE
- Preheat the oven to 180°C (160°C fan) / 350°F. Grease and line a deep 8-inch round tin.
- Mix the main sponge: In one big bowl, add margarine, sugar, flour, baking powder, and eggs. Beat until smooth (electric mixer makes life easier here).
- Chocolate layer: In a small bowl, mix cocoa with hot water to a paste. Stir in a third of the sponge mix.
- Pink layer: Add a few drops of red colouring to half the remaining batter. Stir until even.
- Layer the three mixes into the tin—alternate spoonfuls in random blobs. Don’t swirl!
- Bake for 40–45 mins. Cake is done when golden and springy, or a skewer comes out clean.
- Cool completely on a wire rack. It firms up as it rests.
- Decorate if you like. I sometimes dust icing sugar on top, or drizzle with a simple water icing.

TIPS FROM MY KITCHEN
- I use gel food colouring—it’s stronger and doesn’t mess with the texture.
- My fan oven runs hot, so I start checking at 38 minutes.
- I don’t bother smoothing the batter—just spoon it in and let it self-level.
- Store leftovers sliced in an airtight tin with parchment between layers—stays moister.
STORAGE + SERVING
- Room temp: Keeps well in a tin for 3–4 days.
- Freezer: Wrap slices in clingfilm + foil. Freeze up to 3 months. Defrost at room temp—still soft!
- Serving ideas: I love it plain with tea, but it’s gorgeous with berries and cream. Or even toasted lightly (yes, really) with a smidge of butter.
FAQs – Real Query Answers
Q: Can I use butter instead of margarine?
A: Yep, but soften it first and be ready to beat longer. Butter gives a richer flavour but firmer texture.
Q: Why is there red food colouring in a marble cake?
A: It’s Mary’s twist! Adds a fun third layer (like Neapolitan cake). You can skip it—but it does make it look extra joyful.
Q: Can I make this in a loaf tin?
A: You can! Just bake a little longer—50–55 minutes—and check with a skewer.
Q: My swirls melted together—what went wrong?
A: Probably overmixed when spooning in. Drop separate blobs and resist the urge to swirl.
Try More Recipes:
- Mary Berry Chocolate Rum Cake
- Mary Berry Black Forest Cake (Gâteau)
- Chocolate Roulade (Inspired By Mary Berry)
- Marbled Chocolate Ring Cake (Inspired By Mary Berry)
Mary Berry Marble Cake
Course: CakesCuisine: BritishDifficulty: Easy8
servings15
minutes45
minutes347
kcalLight, fluffy, and swirled with chocolate and pink—this marble cake is a teatime classic with a fun twist.
Ingredients
170g margarine (cold)
175g self-raising flour
175g (6 oz/1½ cups) self-rising flour
1 tsp baking powder
3 large eggs
1 tbsp cocoa powder
1 tbsp hot water
Few drops red food colouring
Directions
- Preheat oven to 180°C (160°C fan) / 350°F. Grease and line an 8″ deep round tin.
- In a large bowl, mix margarine, sugar, flour, baking powder, and eggs until smooth.
- In a small bowl, mix cocoa and hot water. Stir in a third of the sponge mix.
- Colour half of the remaining sponge mix with red food colouring.
- Spoon mixtures randomly into the tin, alternating colours. Don’t swirl.
- Bake for 40–45 mins until golden and springy.
- Cool completely on a wire rack.
- Decorate or dust with icing sugar—optional.
Notes
- I use gel food colouring—it’s stronger and doesn’t mess with the texture.
- My fan oven runs hot, so I start checking at 38 minutes.
- I don’t bother smoothing the batter—just spoon it in and let it self-level.
- Store leftovers sliced in an airtight tin with parchment between layers—stays moister.

