I’ve made this cake more times than I’ve overboiled the kettle, and that’s saying something. It was my gran’s favourite—she always insisted it was the only proper cake to have with a cup of coffee. The first time I tried to make it, I used instant coffee granules straight from the jar… without dissolving them. Crunchy frosting, anyone?
This nearly flopped on me when I rushed the icing and ended up with a greasy mess (spoiler: softened butter doesn’t mean melted). But once I nailed the strong coffee, walnut texture, and that silky-smooth buttercream? Game changer. Let me show you how I fixed it—and how to avoid the crunchy-coffee disaster.
What Makes This Recipe Special
This one hits that perfect nostalgic note: sweet, nutty, and bold from the coffee, without being cloying. Most coffee walnut cakes are either too dry or taste like instant granules. Mary Berry’s version gets it just right—with a few tweaks.
Here’s why it works:
- All-in-one method means it’s quick—but I found beating the eggs in last gives even better rise.
- Very strong coffee (I use espresso from my stovetop moka pot) brings proper flavour. Weak coffee just gets lost.
- And the buttercream? Heavenly. But don’t rush it—if the butter’s too cold, it curdles.
INGREDIENTS + WHY THEY MATTER
- Self-raising flour – Gives the sponge its lift. I once ran out and added baking powder to plain flour—worked, but not quite as airy.
- Baking powder – Just a little extra lift to support the walnuts.
- Walnuts (100g) – Finely chopped so they don’t sink. Adds crunch and depth. Toasting them first? Even better.
- Baking spread – Straight from the fridge! This shocked me, but it actually emulsifies beautifully.
- Caster sugar – Light and quick to dissolve.
- Eggs – Bind and lift. Room temp eggs mix better.
- Very strong coffee – The star. Needs to be brewed, not instant granules. Trust me.
Icing:
- Butter – Softened, not melted. I leave mine out for 30 mins.
- Icing sugar – Sifted, or you’ll get lumps.
- Strong coffee again – No shortcuts here. It makes the icing sing.
Ingredient Swaps That Hold Up
- No walnuts? Pecans work—milder, slightly buttery.
- Gluten-free? I tested with Doves Farm self-raising GF flour—worked beautifully. Just be gentle with mixing.
- Dairy-free? I’ve had luck with Flora Plant Butter and a splash of almond milk in the icing to loosen it.
Mistakes I’ve Made (And How to Avoid Them)
| What Went Wrong | Why It Happens | How to Fix It |
|---|---|---|
| Coffee taste was too weak | Used regular brewed coffee | Brew a double espresso or use instant paste |
| Cake sank in middle | Batter was overmixed or tins too full | Mix just until combined + level tins |
| Icing split | Butter was too cold | Let it soften fully—room temp is key |
| Walnuts sunk to bottom | Too coarsely chopped | Chop finely, toss with a spoon of flour |
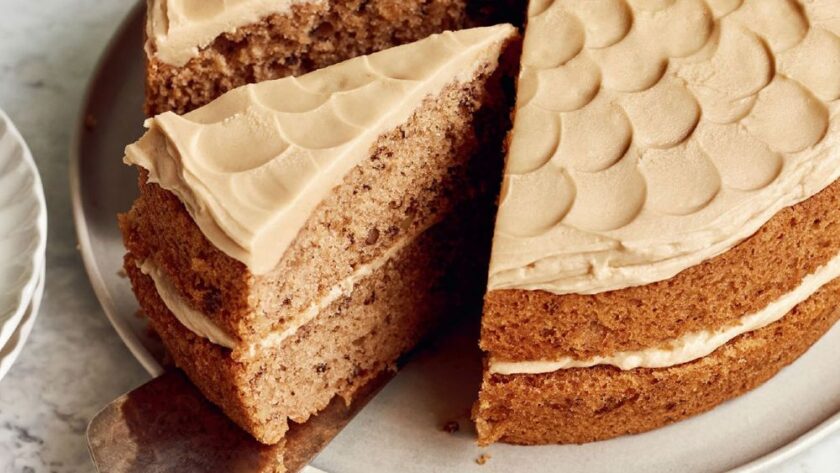
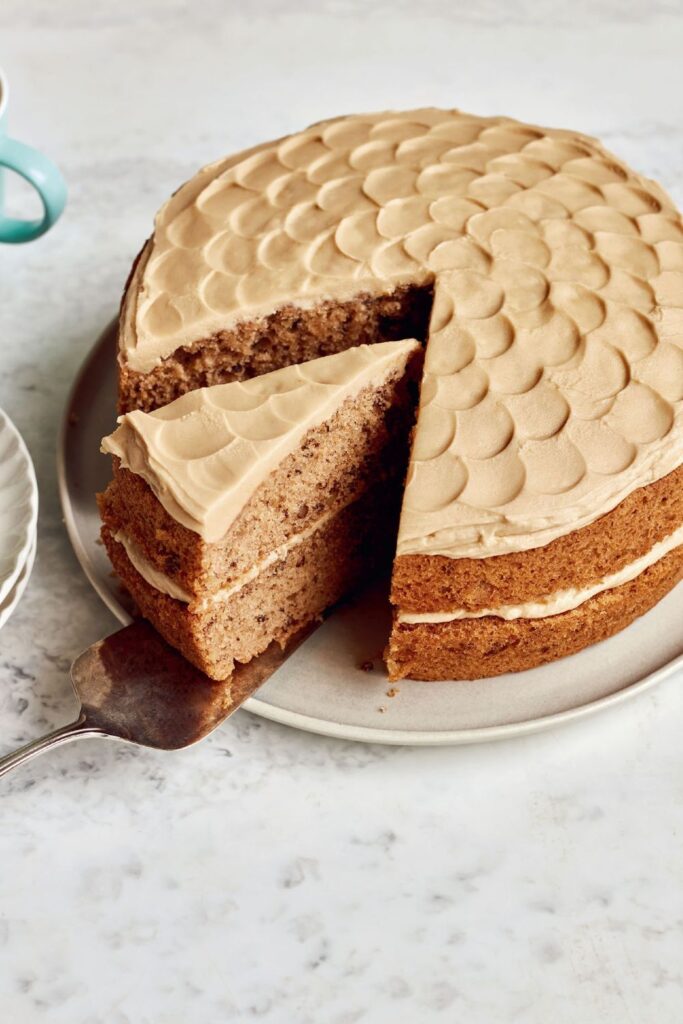
How to Make Mary Berry’s Walnut and Coffee Sandwich Cake
- Prep the tins – Grease and line two 20cm sandwich tins. I use my old metal ones—they give better rise than silicone.
- Make the batter – In a large bowl, mix flour, sugar, baking powder, and chopped walnuts. Add baking spread, eggs, and coffee. Beat until light and fluffy—don’t overdo it.
- Bake – Divide evenly and bake at 180°C (160°C fan) for 25–30 mins. When golden and springy, they’re done. Cool in tins 10 mins, then on racks.
- Make the icing – Beat soft butter with half the icing sugar and coffee. Add the rest, beat until smooth. If stiff, add ½ tsp coffee at a time.
- Assemble – Place one cake upside down. Spread half the icing. Add top layer. Spread rest on top and swirl with a spoon for that classic vintage look.

Tips From My Kitchen
- I toast the walnuts first for extra depth—just 5 mins in a dry pan.
- I use a stovetop espresso maker for the coffee—it’s intense and perfect.
- My fan oven runs hot, so I check at 23 mins.
- I warm my mixing bowl with hot water and dry it—helps everything blend faster.
Storage + Serving
- Keeps for 4–5 days in a tin, or longer in the fridge (but let it come to room temp before eating).
- Freezes well—wrap whole or sliced, and thaw overnight.
- Serve with a proper cup of strong coffee or milky tea. Lovely with whipped cream or a cheeky drizzle of coffee liqueur if you’re feeling fancy.
FAQs
Q: Can I use instant coffee instead of brewed?
A: Only if it’s coffee paste or made super strong. Instant granules on their own don’t give enough depth.
Q: Why did my cake come out dry?
A: Could be overbaked—check your oven temp with an oven thermometer. And don’t skip the coffee—it adds moisture too.
Q: Can I make this as a traybake?
A: Yes! Use a 9×13 tin and bake for about 25 mins. Great for slicing into squares and freezing.
Q: Can I decorate it more?
A: Absolutely. Add walnut halves on top or pipe the icing for a fancy finish.
Q: Can I make the icing less sweet?
A: Try swapping 25g of icing sugar for cream cheese—it softens the sweetness and gives a tang.
Try More Recipes:
- Mary Berry Battenberg Cake Recipe
- Mary Berry Lemon Yoghurt Cake
- Mary Berry Coffee and Walnut Sponge Cake
- Mary Berry Apple And Apricot Cake
Mary Berry Walnut and Coffee Sandwich Cake
Course: CakesCuisine: BritishDifficulty: Easy8
servings20
minutes30
minutes370
kcalA nostalgic, nutty coffee cake with rich buttercream—perfect for teatime or a cosy afternoon bake.
Ingredients
- For the Cake:
225g self-raising flour
1 tsp baking powder
100g walnuts, finely chopped
225g baking spread (cold)
225g caster sugar
4 large eggs
1 tbsp very strong coffee
- For the Icing:
115g softened butter
225g icing sugar, sifted
2 tbsp very strong coffee
Directions
- Preheat oven to 180°C/160°C fan. Grease and line two 20cm tins.
- Combine all cake ingredients in a large bowl and beat until fluffy.
- Divide between tins and bake for 25–30 mins until golden and springy.
- Cool in tins 10 mins, then fully on a rack.
- Beat icing ingredients until smooth. Spread half on bottom sponge, top with second, and finish with remaining icing.
- Swirl top with a spoon for decoration.
Notes
- I toast the walnuts first for extra depth—just 5 mins in a dry pan.
- I use a stovetop espresso maker for the coffee—it’s intense and perfect.
- My fan oven runs hot, so I check at 23 mins.
- I warm my mixing bowl with hot water and dry it—helps everything blend faster.